
Building a martin house is a rewarding project. It helps attract these beautiful birds to your yard.
A martin house provides a safe place for purple martins to nest and raise their young. These birds are not only lovely to watch but also help control insect populations. Creating a martin house might seem like a complex task, but it doesn’t have to be.
With the right materials and a bit of guidance, you can build a welcoming home for these fascinating birds. This project suits beginners and experienced DIY enthusiasts alike. In this blog post, we’ll walk you through the essential steps to create a martin house. Follow along to make a cozy, safe haven for purple martins in your garden.
Credit: martinhouse.org
Introduction To Martin Houses
Have you ever watched the graceful flight of a Purple Martin? These birds are a joy to observe. Building a martin house can bring this experience right to your backyard. It’s a project that combines creativity with a love for nature. Plus, it’s a great way to support local wildlife.
Importance Of Martin Houses
Why build a martin house? Purple Martins rely on human-made structures for nesting. Without these houses, their population could decline. By providing a safe home, you’re playing a crucial role in their survival.
Martins also help control insect populations. They eat mosquitoes, flies, and other pests, making your outdoor space more enjoyable. So, building a martin house is not only good for the birds but also for you and your family.
Benefits For The Ecosystem
Martin houses do more than just support bird populations. They contribute to a healthier ecosystem. By eating insects, martins reduce the need for chemical pesticides. This is better for the environment and your garden.
Moreover, watching martins can be a learning experience. It’s a chance to observe their behavior and understand their role in nature. This can be especially educational for children, fostering a love for wildlife and conservation.
Have you ever thought about the impact of a single birdhouse? It’s amazing how one small project can make such a big difference. Ready to get started?
Choosing The Right Location
Selecting the right location for a Martin house is vital. Place it in open areas, away from trees and buildings. This ensures Martins feel safe and have space to fly.
Choosing the right location for your martin house is crucial. The right spot can attract more martins and ensure their safety. This section will guide you through the key factors to consider.Optimal Placement
Place the martin house in an open area. Martins prefer places with clear flight paths. Ensure the house is at least 40 feet from trees and buildings. This will give martins enough room to fly and hunt insects. Elevate the martin house 12 to 20 feet high. This height protects them from ground predators. It also provides a good vantage point for spotting food.Safety Considerations
Predator safety is vital. Avoid placing the house near dense vegetation. Predators like cats can hide and ambush martins. Choose a spot away from busy roads and human activity. This reduces disturbance and potential threats. Weather protection is another key factor. Choose a location with some natural windbreak. This helps shield the martins from strong winds and storms. Ensure the spot gets plenty of sunlight. Martins thrive in sunny, warm areas. “`Materials And Tools Needed
Building a martin house requires cedar wood, screws, a saw, and a drill. Gather paint, sandpaper, and a measuring tape for finishing touches.
When planning to build a Martin house, gathering the right materials and tools is crucial. Proper preparation ensures a smooth building process and a sturdy final product. Let’s dive into the essential materials and tools needed for this project.Essential Materials
To build a Martin house, you’ll need a few key materials. First, get high-quality wood like cedar or pine. These types of wood are durable and can withstand weather conditions. You’ll also need screws and nails. Choose stainless steel ones to prevent rusting. Additionally, get some paint or sealant to protect the wood from moisture. Don’t forget about the entrance guards. These help keep predators out and protect the birds. You can find them at most hardware stores.Tool Checklist
Having the right tools will make your job easier. Here’s a checklist of essential tools:- Hammer: For driving nails into the wood.
- Drill: Useful for making precise holes and driving screws.
- Saw: A handsaw or a circular saw will be needed to cut the wood.
- Measuring Tape: Ensures your cuts and placements are accurate.
- Paintbrush: For applying the sealant or paint to protect the wood.
Designing Your Martin House
Creating a martin house involves careful design. A well-designed house attracts purple martins. They need the right environment to thrive. Let’s explore some popular designs and dimensions.
Popular Designs
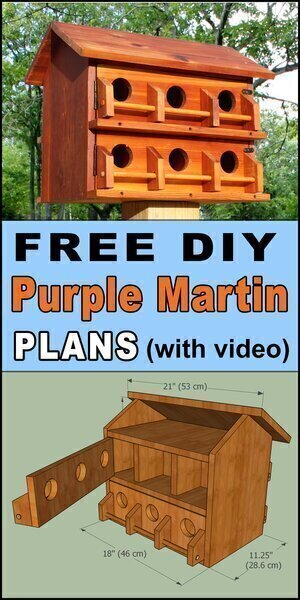
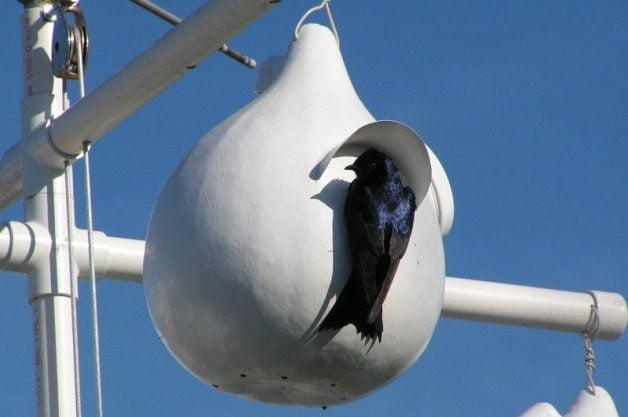
Martins prefer houses with multiple compartments. These designs mimic their natural habitats. Gourd-shaped houses are very popular. They provide good protection from predators. Another common design is the apartment-style house. It offers multiple nesting spaces in one structure. Traditional box houses are also effective. They are easy to build and maintain.
Size And Dimension Guidelines
Each compartment should be at least 6 inches tall. The width should be around 6 to 7 inches. The depth should be about 12 inches. Proper dimensions ensure comfort and safety for the birds. The entrance hole should be 2 to 2.5 inches in diameter. This size prevents larger birds from entering. Ensure adequate ventilation. This keeps the nesting area cool.
Building The Martin House
Creating a martin house is a rewarding experience. These birds offer natural pest control by eating insects. Follow these steps to build a cozy home for them.
Cutting And Preparing Wood
Start by selecting quality wood. Cedar or pine works well. Measure and mark the wood pieces according to your design. Use a saw to cut the wood. Sand the edges to remove splinters. This makes the house safe for the birds.
Assembling The Structure
Begin by assembling the base and the sides. Use nails or screws to secure them. Make sure each piece fits snugly. Attach the front and back panels next. Create entry holes in the front panel. These should be around 2 inches in diameter. Finally, add the roof. Ensure it overhangs to protect from rain.
Credit: suncatcherstudio.com
Painting And Finishing
Painting and finishing a Martin house adds beauty and protection. Choose weather-resistant paint for durability. Ensure even coats for a smooth finish.
### Painting and Finishing The painting and finishing stage is crucial in building a beautiful and functional Martin House. Not only does it add aesthetic appeal, but it also ensures the house is safe and durable for the birds. Let’s dive into the specifics of choosing safe paints and applying finishing touches. ### Choosing Safe Paints Selecting the right paint is paramount for the health and well-being of your feathered friends. You want paints that are non-toxic and eco-friendly. Avoid lead-based paints and opt for water-based latex paints. These are safer and less likely to emit harmful fumes. Additionally, choosing colors that blend with the environment can help the house look more natural. Light shades can keep the house cooler in summer. ### Applying Finishing Touches Applying finishing touches involves more than just slapping on a coat of paint. Pay attention to the details that make your Martin House inviting. Use a small brush to paint intricate areas and edges. This ensures an even coat and a professional look. Consider adding decorative elements like small perches or painted designs. These not only beautify the house but also make it more appealing to the birds. Lastly, seal the paint with a clear, non-toxic varnish. This protects the paint and makes the house weather-resistant. Did you ever spend hours painting only to realize the color clashes with your garden? Choosing complementary colors can avoid this mishap. How do you ensure the birds feel at home in your Martin House?Installing The Martin House
So, you’ve decided to build a martin house—great choice! After constructing your birdhouse, the next step is installing it. This part is crucial as it determines how safe and appealing the house will be for the martins. Let’s dive into the details of mounting techniques and ensuring stability.
Mounting Techniques
Mounting your martin house is a straightforward process if you follow the right techniques. First, ensure you have a sturdy pole, preferably made of metal. Metal poles resist weather conditions better and are harder for predators to climb.
Place the pole in a location that is open and away from tall trees and buildings. Martins prefer wide-open spaces for flying and hunting. Use a concrete base if possible, to keep the pole firmly in place.
Attach the house securely to the top of the pole. A common method is to use a mounting bracket or a flange system. These provide a stable base and make it easier to remove the house for cleaning.
Ensuring Stability
Stability is key to a successful martin house installation. If the house wobbles or leans, it may deter birds from nesting. Double-check the pole is straight by using a level.
Consider adding guy wires if your pole is exceptionally tall or if your area experiences strong winds. Guy wires anchor the pole from different angles, providing additional support.
Lastly, secure all connections tightly. Loose bolts or screws can cause the house to tilt or fall. Regularly inspect and tighten these to maintain stability.
Installing a martin house isn’t just about putting it up; it’s about creating a safe and welcoming environment for these beautiful birds. Have you ever wondered if the location of your martin house could affect its occupancy? Share your thoughts and experiences in the comments below!
Credit: www.birdsandblooms.com
Maintaining Your Martin House
Maintaining your martin house ensures a safe and welcoming home for the birds. Regular care keeps the house in good condition. It also encourages birds to return each season. Let’s explore two key aspects: Regular Cleaning and Repair and Upkeep.
Regular Cleaning
Cleaning the martin house is crucial. Clean the house at least twice a year. Remove old nests and debris. This prevents parasites and diseases. Use a mild soap and water mixture. Rinse thoroughly and let it dry completely. Ensure all compartments are clean.
Repair And Upkeep
Check the house regularly for damage. Look for cracks, holes, or loose parts. Fix any issues immediately. Replace broken pieces to ensure the house is safe. Paint or treat the wood to protect it from the weather. A well-maintained house lasts longer and attracts more birds.
Frequently Asked Questions
How To Start A Martin House?
Choose a suitable location, install a pole, and attach a martin house. Ensure proper height and predator protection.
Which Direction Should A Martin House Face?
A Martin house should face east or southeast. This direction provides optimal morning sunlight and helps attract Purple Martins.
What Size Hole For A Martin House?
A Martin house needs entrance holes that are 2 1/8 inches in diameter. This size keeps predators out.
Do Purple Martins Prefer Gourds Or Houses?
Purple martins prefer gourds over houses. Gourds offer better protection from predators and elements. Ensure proper ventilation and drainage in gourds.
Conclusion
Building a martin house can be a rewarding project. It helps local bird populations. Plus, it adds charm to your garden. Follow the steps carefully. Use quality materials. Your martins will soon have a safe home. Enjoy watching these birds thrive.
Share your success with friends and family. Happy birdhouse building!